Each group can host its own website. Within our website manager, you have options to build a complete website with landing pages, a membership feature, blog page, store, and more.
The General section covers the foundational settings for your website. It includes options to set your website URL, configure domain forwarding and DNS records, add SEO-friendly metadata, and enable password protection for members-only content. You’ll also find tools to customize visitor tracking, social sharing buttons, favicons, website cache settings, and advanced <HEAD> section customizations using HTML or CSS.
This section ensures your site is properly configured, secure, and optimized for search engines and user access.
After setting up CNAME or A records, enter your domain and click Verify.
For example, if your domain is www.superwidgets.com, then you should have the following:
Your Website URL is set to superwidgets and
Custom Website Domain field is set to www.superwidgets.com:
If the records are set up correctly, you will get a success message. If there are any issues, a failure message will be displayed with a short description of what needs to be fixed.
Allow Iframe in Domain(s):
If you want to embed an iframe from an external website, you must allow it by adding the domain to the Allow Iframe In Domain(s) field.
By adding the domain to the field, the system will add the following header on the backend:
If an iframe displays the following error, add its domain to the Allow Iframe In Domain(s) field:
Brief Website Description
This field allows you to add internal notes about your website. These will only be seen by you and those that have access to the Website Manager.
Searchable Keywords (SEO)
Keywords that appear in your website's META keywords tags. This is helpful for getting your page indexed by search engines.
Password Protect Your Website
To restrict access to the information on your public website, you can enable password protection.
There are two types of protection available:
One Password For All
This option allows you to set one password for everyone to use.
Member Login (Email/Password)
This option allows you to set up a member's website by giving members an option to sign in and see content specific to their record.
Members are contacts within a specific group. So any contacts within your website's password-protected group would be allowed to log in.
When setting up the Member Login feature, you have a few options:
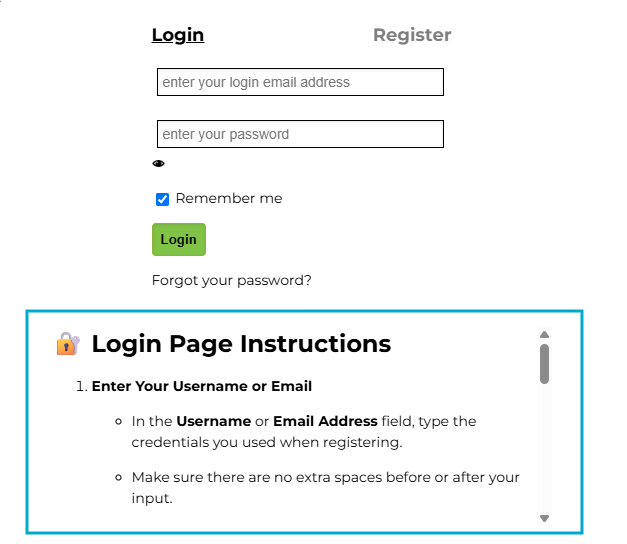
Instructions for the login page (goes below the login form)
Allows you to create a custom message for the login page.
In the screenshot example above, instructions are provided that guide the user on how to fill out the log-in form, including if they run into any issues.
If you would like to replicate this look, you can add the below code snippet to the HTML in your website's <HEAD> section:
Create temporary password for new users & forgot password
If set to "Yes", a temporary password will be created and sent to the user. They can use this password to log in or choose to set their own.
If set to ‘No,’ the user will be prompted to create their own password.
Get Password Email Template
Customize the email that is sent when a new member registers.
To work correctly, your custom message must include one of the following placeholders:
If the user has never accessed your website, this placeholder will generate a link for them to set their password.
If the user has visited before, the email will include a temporary password, a login link, and a set password link.
Includes only the link to set a password. It does not include the login page link.
Outputs the raw URL for the password setup page. Use this if you're designing a custom button and only need the link.
The link generated will have the text "Get Password", directing the user to a page where their password will be sent automatically.
You can design your message however you'd like, but you must include one of these placeholders. If not, a standard email will be sent instead.
Forgot Password Email Template
Customize the email that gets sent when members click the Forget Password link.
To work correctly, your custom message must include one of the following placeholders:
Inserts the "Reset Password" link for the user.
Insert just the raw URL. This is helpful if you're creating a custom button or using your own link text.
The link generated for either of these options will take users to a page where they can set a new password.
You can design your message however you'd like, but you must include one of these placeholders. If the system does not see a placeholder, a standard email will be sent instead.
Instructions when new password email sent
Allows you to create a custom message for when a new password is sent.
Additional CSS for the Set Password page
After users click the link to set their own passwords to log in to your membership website, they are taken to a page where they enter their existing password and then set a new password.
This field allows you to customize the CSS.
Invalid Login Message
If someone tries to log in and does not use the correct username and password, they will be shown this message.
Note that the or link is required so that users can click a link to recover their password.
If you would like to replicate this look, you can add the below code snippet to the HTML in your website's <HEAD> section:
If set to "Yes", it will log users out when they close their tab.
If set to "No", it will keep users logged in, even after they close their tab.
Options
In the options section of the General tab, you can customize various settings related to
Track Visitors to your Website
Turn on / off tracking for website visitors
Add Facebook "Like" button to your Homepage / Add X Share button to your Homepage
Turn on Facebook and / or X share button, which will be added to the bottom of the page.
Use your own favicon
A favicon is a small icon that will be displayed on the browser tab, allowing people to easily identify the websites they are on. This setting allows you to add a custom favicon to your website.
Show your group name in your website header
In certain website templates, the header will show either your group's name or a custom name of your choosing.
Show News/Blog Section
Allows you to turn on or off the News / Blog Section of your website.
Show Membership Login
Adds Email / Password fields to the homepage, allowing members to login.
Website Cache Time
Allows you to adjust the cache time, which determines how quickly your website gets updated after you make changes.
If you set this to 0, changes will be made immediately.
HTML in your website's <HEAD> section
Allows you to add additional information to your website's <HEAD> code. This includes any meta, script, or style tags.
This is useful if you want to add styling, fonts, or additional functionalities to your entire website without creating a custom template.
We include some information by default in your website's <HEAD> section, such as "Searchable Keywords", in the section above.
Below are examples of font and style code you can add:
The Pages section allows you to add, remove, edit, and organize the structure of your website’s pages. Each page can be customized with its own template, metadata, and navigation settings.
You can also reorder pages, import or delete content, and manage standalone landing pages.
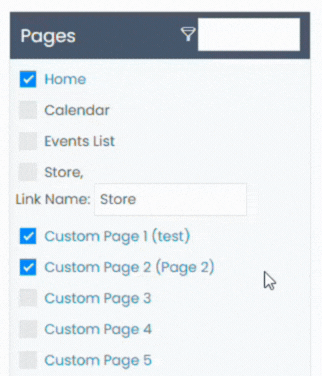
Add a name for the page (how it will display on the website) in "Page Name" field
On the left-hand side, check the box next to the custom page
Click the "Save All Changes to Website" button.
Remove Page
To remove a page from your website, you can uncheck the box next to the custom page and click Save All Changes to Website.
Edit Page
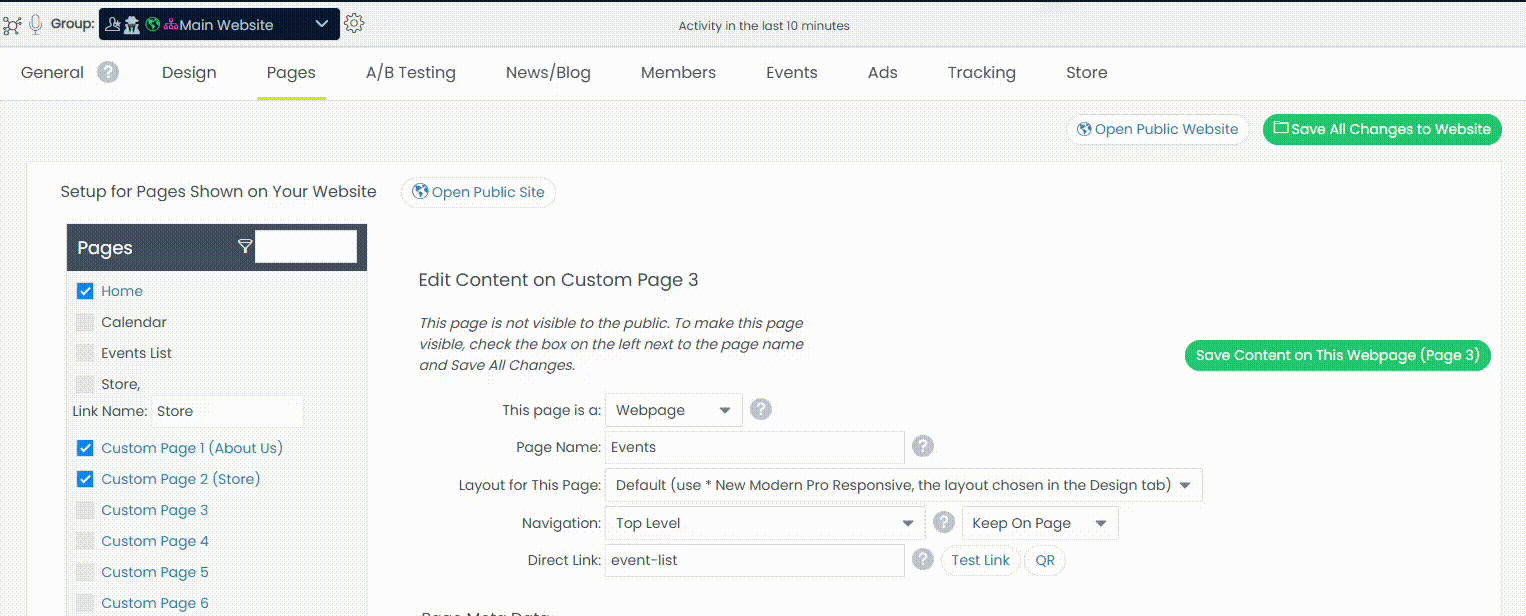
Page Details and Meta Data
This page is a
Choose whether you want the current page to be a Website Page or a Landing Page:
Website Page
Part of your larger website, showing up in your main navigation.
Use your website's template to control the layout.
The templates cannot be modified.
Ability to adjust content within template using WYSIWYG.
Landing Page
A standalone page.
Everything (HTML, meta data, navigation) is edited in the WYSIWYG editor below.
Use the Templates button to access pre-made designs.
Ideal if you’re not a developer.
Not included in your website's main navigation.
Page Name
Required if you want to include this page in your main navigation. This name appears in your site’s main navigation.
Avoid using a long name, as your main navigation has limited space.
Layout for This Page
Allows you to change the template used for individual pages.
By default, it will use the template set for the website (set in Design tab), but you can use any pre-built templates or use a custom template of your own.
Navigation
Choose where this page appears in your website’s navigation:
Primary Level – Shows in the main navigation.
Sub-page – Appears under another primary page (select it from the dropdown).
Do not show in navigation – Hides the page from navigation. Useful for thank-you pages or keeping the menu simple.
Direct Link
A Direct Link to a page allows you to specify a URL that goes directly to this page. You can set a custom URL for this page:
Use letters, numbers, and hyphens only (e.g., https://yoursite.greenrope.com/your-page).
To redirect to an external website, enter the full URL (including http:// or https://).
If redirecting a visitor, the WYSIWYG content will be skipped and users will go directly to the external link.
Page Meta Data
Page Title (Window)
Title that displays on the Browser tab
Page Description (Meta tag)
Search engines (Google, Bing, etc.) use meta tags to help categorize and display your page in search results.
Optional, but recommended for better visibility.
Keep it concise and relevant (max 255 characters).
Works only if a Direct Link is set for this page.
Page Keywords (Meta tag)
Search engines use keywords to help match your page with relevant search terms.
Add words or phrases that relate to the content on this page.
Helps improve search visibility.
Works only if a Direct Link is set for this page.
Open Graph Image (Meta tag)
Customize the image that is displayed when a page is linked on social media, via SMS, and other websites.
In general, the image should have an aspect ratio of 1.91:1.
Minimum dimensions - 200 x 200 pixels
Larger displays - 600 x 315 pixels
Optimal dimensions - 1200 x 630 pixels
File size - 8 MB or lower
SEO Indexing
noindex - When this option is enabled, it tells search engines not to include the page in search results. It's recommended for pages that are low-value, temporary, or not intended for public access.
nofollow- When this option is enabled, it tells search engines not to follow the links on the page. This is useful when the links are user-submitted or unverified—such as in comment sections, guest posts, or areas where paid links might appear.
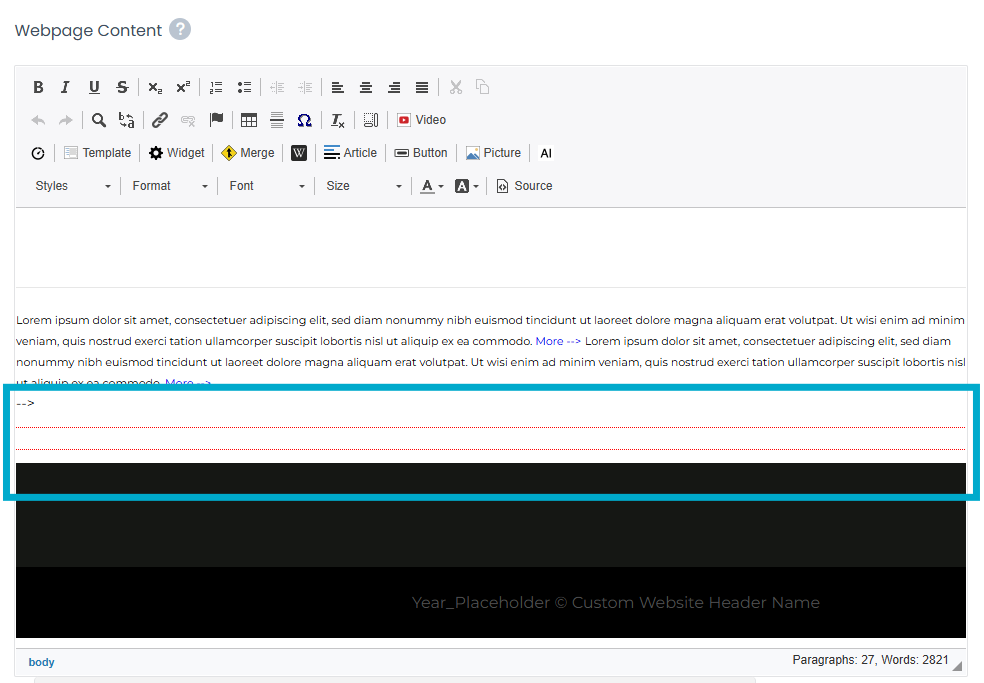
Webpage Content
This section is where you edit the actual content of your page.
Use the red and white box below to edit your page content.
If you're editing the HTML source, only make changes between these two comment tags:
<!-- Start Editing Here --><!-- Stop Editing Here -->
Important: Do not remove these tags—they define the editable area of the page.
Import Page Content
If you want to import page content from another page in your website, you can use the "Import Page Content" button.
Delete Page Content
If you want to delete the page content for the current page, which resets the page to its original format, you can use the "Delete Page Content" button.
Reordering Pages
You can re-order the pages by finding the page in the Pages section (left hand side), dragging and dropping to the new position, and clicking Confirm to save the position:
Misc
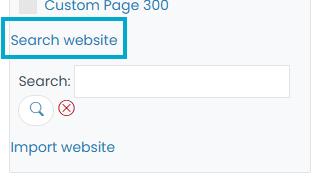
Searching Website
You can search the content of your website by using the Search Website feature.
Importing Websites
You can import other websites from other groups by using the Import Website feature.
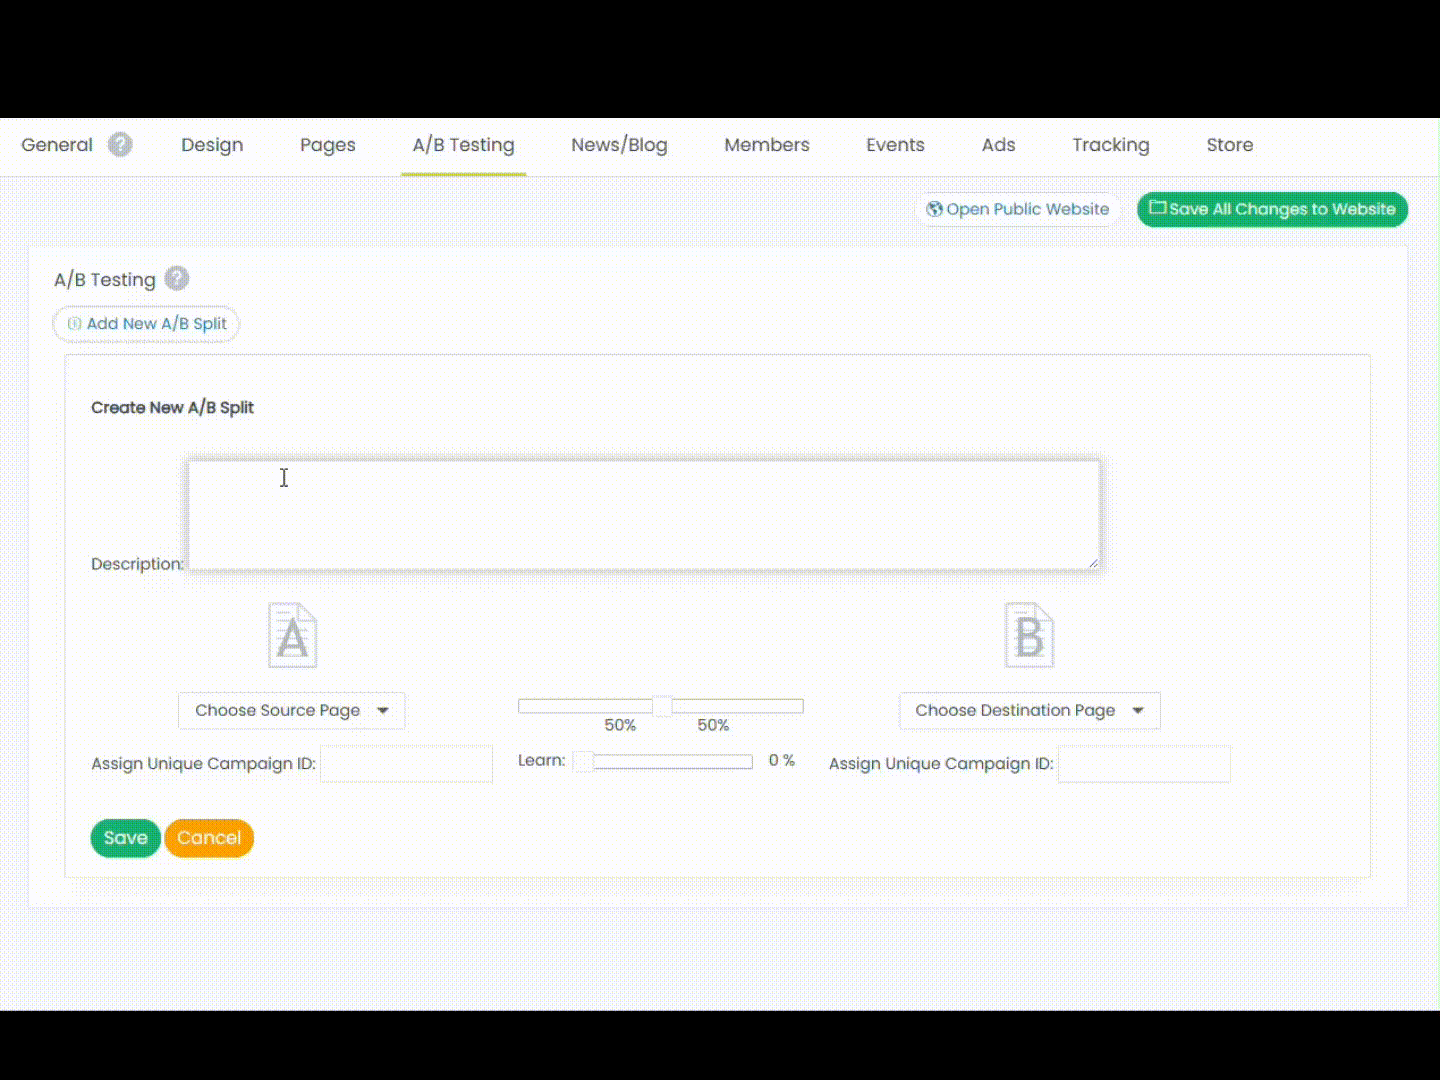
Use A/B Testing to compare two versions of a webpage (Page A and Page B) to determine which performs better based on user behavior. You can control traffic distribution, monitor performance metrics, and let the system automatically optimize which version gets shown more often.
Create Page A and Page B
Page A is your default page.
Page B is the test version with changes.
To copy Page A’s content, go to a blank page, click “Import Webpage”, and select Page A.
Edit that new page to become Page B.
See the Pages section to learn more on how to add and edit pages.
Set Up the A/B Split Rule
Go to the A/B Testing tab
Click the "Add New A/B Split" button
Add your A and B pages using the dropdowns
Assign a unique campaign ID to each page
Ensure the campaign ID is unique to avoid data conflicts
This will help track visitors, allowing you to report on various metrics.
We'll set a cookie, ensuring the returning visitors see the same version.
Use the slider to control how much traffic is sent to each page:
50% will evenly split traffic
60% | 30% will send 60% of traffic to Page A and 30% to Page B
25% | 75% will send 25% of traffic to Page A and 25% to Page B
(Optional) Use the Learn slider to let the system automatically send more traffic to the better-performing page.
The Learn slider automatically adjusts traffic between Page A and Page B based on performance.
Each night (around midnight local time), the system reviews the past 48 hours of traffic data.
The system shifts more traffic to the better-performing page using three key factors:
Bounce rate
Average points per visitor
Average conversion value per visitor
The Learn Slider helps optimize results over time without manual adjustments.
Track and Analyze Performance
Use Website > Tracking or Website > Campaigns and Affiliate page to filter data by campaign ID.
Compare visitors, page views, and conversions to find out which page performs better.
Once you’ve found the winning page, deactivate the test and update Page A accordingly.
The News/Blog section enables you to publish original blog content, import external RSS feeds, and manage articles. Features include enabling/disabling blog visibility, categorizing posts, allowing user comments, and even generating AI-assisted blog content with custom SEO keywords and images.
Every blog/newsfeed can have an RSS feed associated with it. An RSS feed is a URL that people can use to easily import your articles into their own newsreaders.
To enable RSS publishing:
Toggle "Publish RSS Feed" to make it available on your public website.
Publishing the RSS feed will also enable Automatic Blog Digest Emails (set in Group Settings > Email/Web Options).
You can add outside news sources (e.g., http://news.yahoo.com/rss) to display third-party articles on your blog.
Add RSS url to Additional Feed URL field
Toggle field to make it available
Add additional RSS URL feeds by clicking the Add RSS Feed button
Article Management
Archive blogs on website
Set the maximum number of blog posts to show on your website. You can display up to 10 of your most recent posts—older posts will be archived automatically.
Allow comments on news/blog posts
Allow visitors to comment on your blog or news posts. Set to "Yes" to enable commenting.
To require approval for new comments, enter an email address in the “Notify for approval” field.
Notifications will be sent to this address when comments are submitted.
Categories
Create categories blogs will fall into. Categories can be used to filter for specific blogs on your website and internally in the Posts section of News/Blog.
Post Settings
Each blog has the following fields:
Headline - This is the title of the blog and how it will appear on your website.
Display blog from - Set a timeframe for when the blog will be visible on your website. If left blank, a blog post will last forever.
Visible on Web - Set whether the blog is visible or hidden on the website.
Blog Categories - Add blogs to appropriate categories. You can add more than one category to a single blog.
Meta Title - This is the title that will be used for SEO purposes. Limited to 70 characters.
Meta Description - Description used for SEO and some RSS feeds. Limited to 150 characters.
Blog Content - Where the content for the blog will be built. Built inside the WYSIWYG editor.
Author - Optional field that will add author to the RSS feed. If the field is left blank, the author field in the RSS feed will be left blank.
AI Blog Generator
Requires OpenAI / ChatGPT access with DALL·E enabled (see help article "OpenAI Integration").
This feature allows you to automatically generate blogs. Once you set up the criteria for the blog, you'll get a preview email the day before publishing to review or edit the content. Each post includes an AI-generated image, saved in the Media Library under "AI Blog Images".
To get started:
Click Add AI Blog Generator
Select a blog category
Select frequency
In the Topics field, enter a comma-separated list of topics for the AI to randomly choose from.
Example: lead generation, customer retention, marketing automation, sales strategy
In the SEO Keywords field, enter a comma-separated list of keywords and phrases you want the blog generator to include. These help improve your blog's visibility in search engines.
Examples: email marketing, customer engagement, small business growth, CRM software
In the Instructions field, use this area to add extra guidance for the AI when generating blog content.
You can include:
Preferred reading level (e.g., general audience, professional, academic)
Details about your business or industry
Specific content strategies (e.g., tone, keywords, call-to-action, topics to include or avoid)
This helps the AI create content that aligns with your goals and audience.
In the Author field, enter the name and/or email of the blog author in this format email@example.com (First Last):
Example: jane.doe@example.com (Jane Doe)
In the Send Notification To field, enter one or more email addresses, separated by commas. Anyone listed will receive a notification the day before the blog is published.
Example: jane@example.com, mark@example.com
Add Blog
Go to Website > Manage Site > General
Find the "Show News/Blog Section" field
Set the field to "Yes"
Click the "Save All Changes to Website" button
Go to the Pages Tab
Select Your Blog Page
Add a Blog Placeholder
In the Webpage Content area (within the editable section), insert one of the following placeholders:
The Purr-fect Companion: Why Owning a Cat Is More Important Than You Think
Cats have captivated human hearts for thousands of years — from ancient Egypt to modern living rooms around the world. But beyond their charming whiskers, soft fur, and independent attitude, cats bring with them a wide range of benefits that many people don’t fully realize. Whether you're a lifelong feline fanatic or considering your first pet, here's why owning a cat might just be one of the best decisions you ever make.
🐾 1. Emotional Support and Stress Relief
One of the most profound reasons to own a cat is the emotional companionship they provide. Research shows that simply petting a cat can trigger the release of oxytocin — a hormone associated with love and bonding — and reduce levels of cortisol, the stress hormone. Their rhythmic purring has even been linked to calming effects similar to meditation.
Whether you're having a rough day or simply need a moment of peace, curling up with a cat can offer emotional comfort and reduce anxiety and depression.
🐱 2. Low-Maintenance Companions
Unlike dogs, cats don’t need daily walks, constant supervision, or intense training. They groom themselves, can be left alone during the workday, and don’t mind a little solitude. Their independence makes them ideal for people with busy schedules, small living spaces, or a preference for a more laid-back pet experience.
Owning a cat can fit seamlessly into your lifestyle, without the overwhelming responsibilities that can come with other pets.
🧹 3. Natural Pest Control
Cats are natural hunters, and their presence alone is often enough to deter rodents and insects from invading your home. If you’ve ever seen a cat “on the prowl,” you know how instinctive their hunting skills are. They keep pests in check without the need for chemicals or traps.
In short: cats are eco-friendly exterminators.
❤️ 4. Health Benefits for You
Owning a cat has been associated with a variety of physical health benefits. According to studies, cat owners are at a reduced risk of heart attacks and strokes. The calming influence of a cat can lower blood pressure, and the routine of caring for a pet can encourage healthy habits and provide structure.
Cats don’t just warm your lap — they can also help protect your heart.
👪 5. Great for Families, Singles, and Seniors
Cats make excellent companions for people of all ages. For families, they teach kids about empathy and responsibility. For singles, they offer connection and comfort without overwhelming demands. And for seniors, cats provide companionship, daily purpose, and physical affection that can help reduce loneliness and improve quality of life.
Their adaptability means they can thrive in many different households and bring joy wherever they go.
🌍 6. Support Pet Adoption and Animal Welfare
When you adopt a cat — especially from a shelter or rescue — you’re giving a loving home to an animal in need. Millions of cats are waiting in shelters for someone to give them a second chance. By adopting, you’re not only gaining a friend, but also saving a life and helping to combat overpopulation.
Adoption is one of the most compassionate and rewarding choices you can make.
Final Thoughts
Cats are more than just pets — they’re healers, friends, comedians, and quiet companions all rolled into one furry package. Their quiet presence can speak volumes, and their quirky personalities are endlessly entertaining. Whether you live in a studio apartment or a country farmhouse, there’s likely a cat out there who would love to call it home.
So if you've ever considered adding a feline friend to your life, now might be the purr-fect time.
Thinking of adopting a cat? Visit your local shelter or rescue organization and meet your future best friend today. 🐾
The blog displays only if both the placeholder and blog feature are active. Ensure your page is live and published, so visitors can access your blog content.
RSS Syndication
You can share your blog with other websites using the RSS feed links below.
rss.pl shows the full blog history
rss10.pl shows the 10 most recent posts
To display only one blog category, customize the feed URL accordingly.
RSS Feed Links (replace ##### with your account number):
Full feed: https://app.greenrope.com/rss.pl?#####_107-4_Page2.html
This Members section helps you build a members-only area on your site. You can create dedicated member pages, choose which contact fields to display, and apply filters for customized visibility.
Optional features include forums, profile updates, and member lists, supporting interactive communities. You can create a member exclusive website by password protecting your website.
This is from the company focused worklowJensine Outlook Ramirez blah blah blah blah 30 (DECIMAL)Jensine Outlook Ramirez blah blah blah blah 210186 (DECIMAL)Jensine Outlook Ramirez blah blah blah blah 210386 (DECIMAL)Jensine Outlook Ramirez blah blah blah blah 210386 (DECIMAL)
Account Type:Playing and downloading games, Developing and uploading games
You can choose to display specific fields from the contact record.
These can be system fields (Address, Email, Phone, etc.) or custom user fields (e.g., Account Type (User1), Account Manager (User10), etc.).
Summary vs. Detail Pop-Up:
The information can be displayed in two separate places.
The summary shows the information directly on the Member's page.
The detail pop-up shows the information in a pop-up window.
Field visibility
You can only select user fields that are set to be visible or editable to group members.
To adjust this setting:
Go to Contacts > User Fields.
Search for the field and click on it to edit
In the Group Member Access dropdown, select either of the following:
Visible to group members
Editable by group members
Showing Positions/Tags
You can choose to show all group members or only ones that have a specific set of tag(s).
Show Indexes
This feature allows you to set restrictions on who can see which members.
You are given 5 filter options (primary, secondary, tertiary, etc.). Each filter you set adds criteria the user must meet before being able to see the list.
For example, if you have the following filters:
Primary - State
Secondary - Company
Tertiary - Account Manager
Sarah S. is logged into the website and looking at the member's page. She will only see members who are:
a) From the same state (e.g., NY)
b) From the same company (e.g., Citigroup)
c) Managed by the same person (e.g., John M.)
If group members do not match all the following criteria, they will not show up on Sarah's member's page.
While it's not required you set your website to a member's website (i.e., add a password), it's recommended if you want to provide more accurate results.
The Events section lets you display upcoming events on your website. You can select which event types to show, include location or notes, and choose whether to display events from other groups as well.
Show On Calendar
This setting will add the event type to your website's calendar. If the event is public, it will allow people to register.
Show Address
If the event uses a location that has an address attached, a map will be displayed.
To attach a location to an event type:
Settings > Calendar
Event Locations tab
Hover over location
Click Pencil icon
Add address information
Click Save and Close
Show Event Notes
This setting will add the event's notes (from the event's Description tab) in the preview.
Combine Calendars
This option allows you to add other group's events to our public calendar.
If you choose to include another calendar, it will show the address and event notes by default.
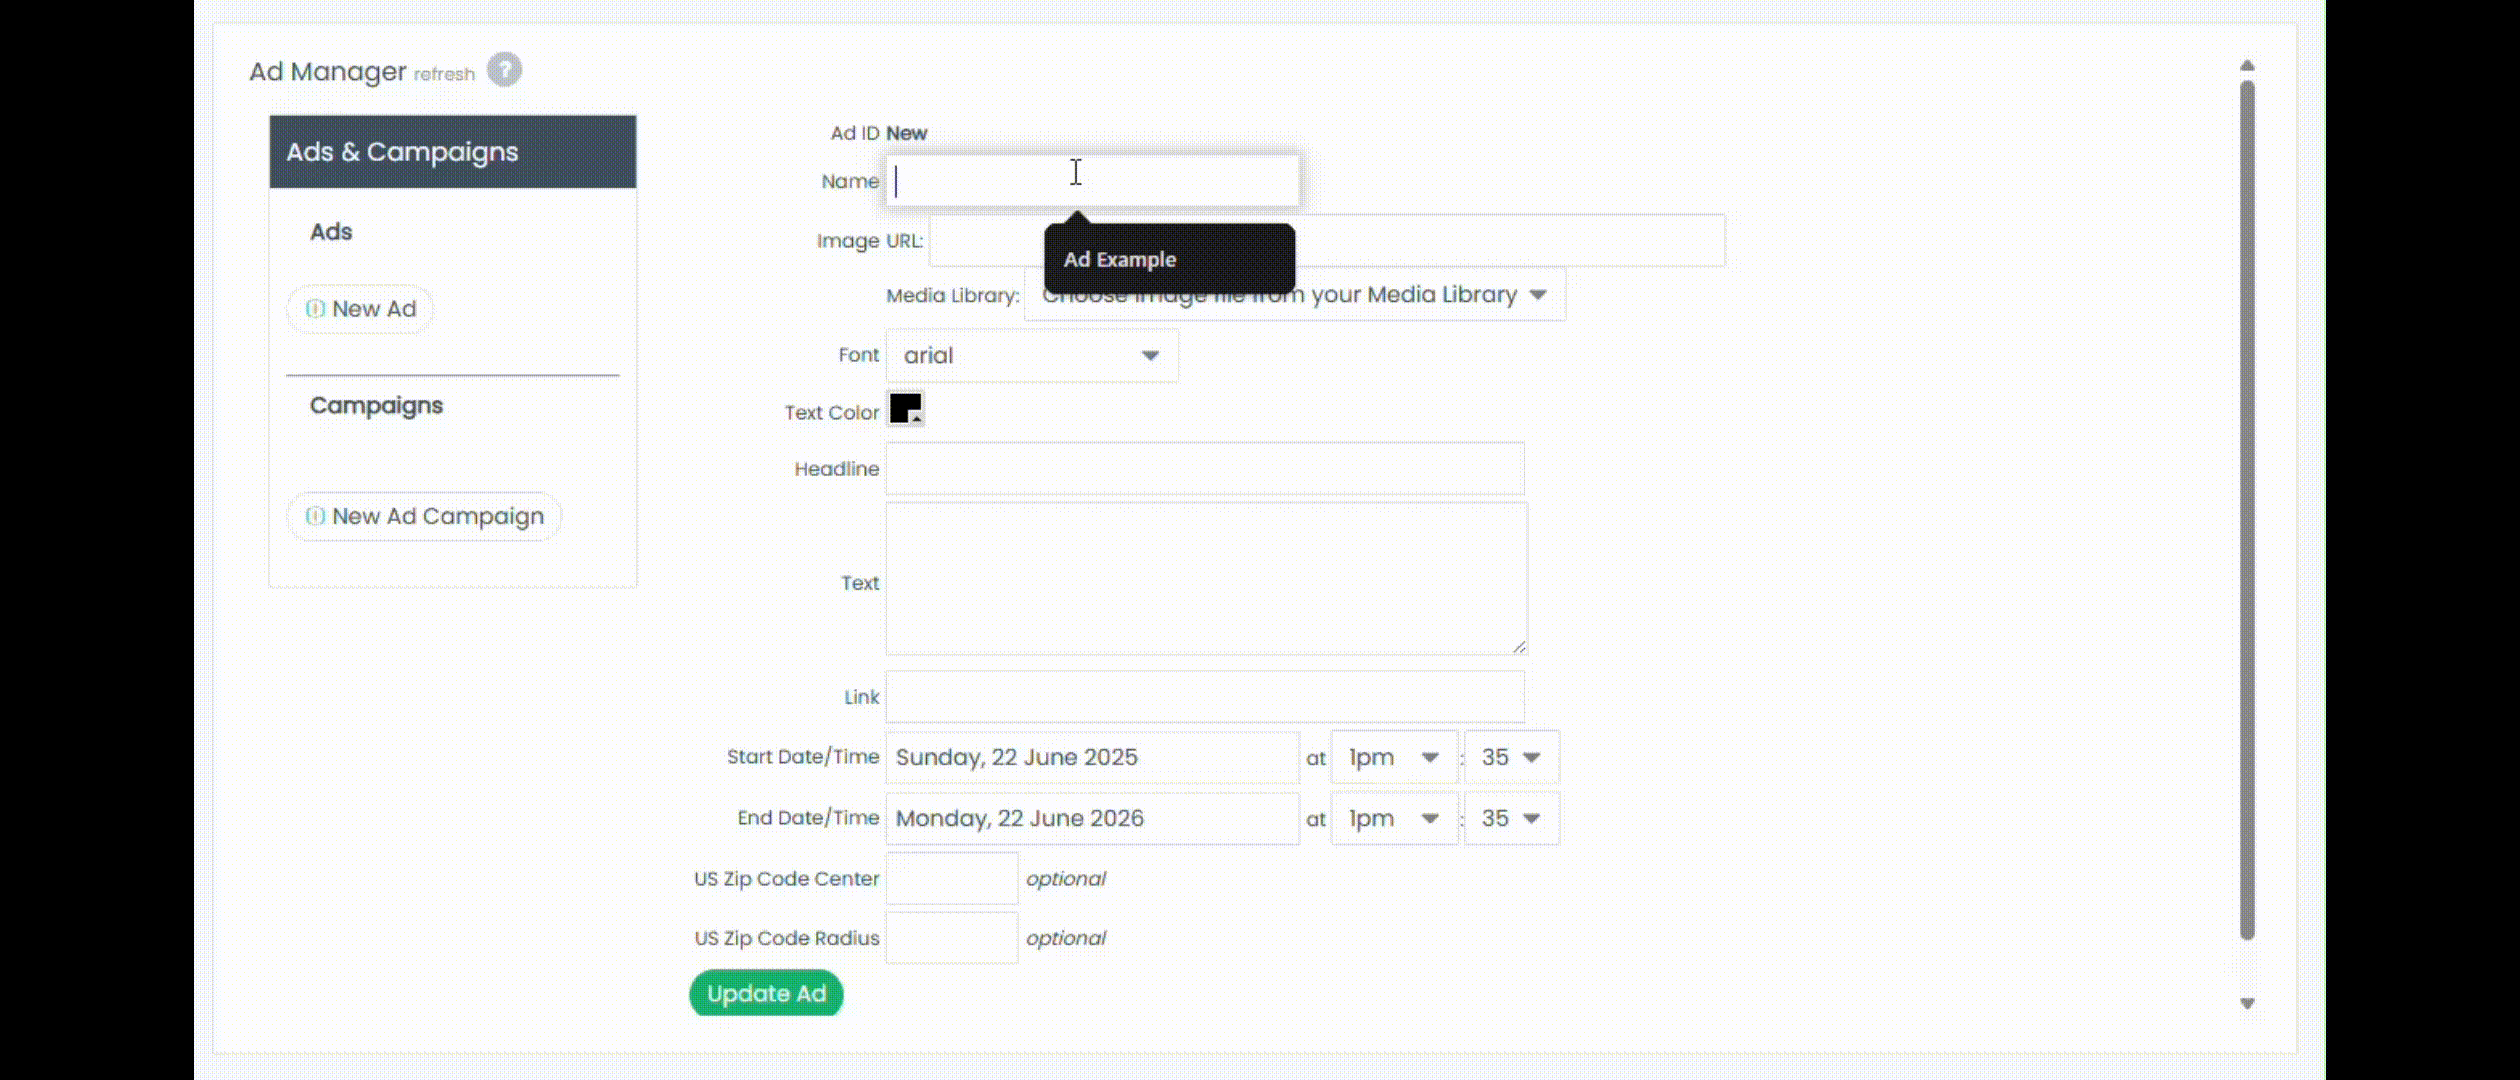
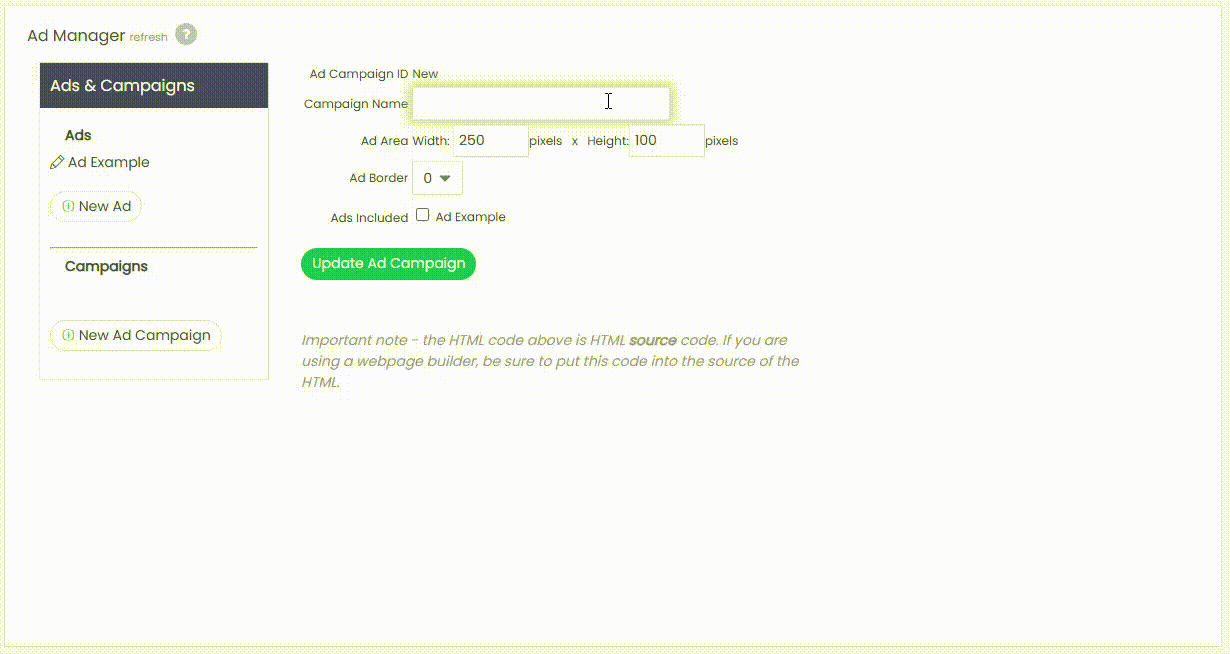
This section lets you create and manage ad campaigns. You can build ads with text and images, define start and end dates, group them into campaigns, and generate embeddable HTML to display rotating ads on any website.
The Ad Manager screen lets you create and publish advertising campaigns on any website.
Setting up a campaign involves two steps:
Create Ads:
Build individual ads with optional content (headline, image, and main text) and customize their appearance.
Important note: You must manually adjust the State and End Date/Time. A date that is past the End Date/Time will not show up on your website.
Be sure to save each ad after creating it.
Create a Campaign:
Select the ads you want to include and format them to fit specific height and width dimensions.
Check the boxes next to the ads you want to rotate in the campaign.
Once you have saved the ad campaign, a preview appears on the right side of the screen.
Note: Impressions and clicks on the preview do not count toward your campaign stats.
To publish your ad, copy the dark orange HTML code and paste it into the source code of any website. The ad will become active immediately.
Tracking allows you to monitor site visitors, including those on external sites.
Features include domain tracking, campaign filters, geographic and referral analysis, automation triggers, and page scoring. You can add tracking scripts to all pages or specific ones via the provided HTML code.
Domain Tracking
The left panel lists domains with active tracking. Click a domain to view stats for all its pages.
Routing
Use routing to merge or filter traffic from multiple domains. After setting up routes, click Fix to update your tracking data.
Campaign Filters
Filter traffic by marketing campaigns. Check the boxes to see data only from those sources.
Visitor Insights
The first tab shows detailed visitor data:
Pageviews = total page loads
Unique Visitors = distinct individuals in a given month (one visitor counted once per month)
Your Contacts Section
Identifies known visitors after they take an action—such as clicking a link in your email, updating their profile, or submitting a form. Their activity is tracked, and you can assign scores based on the value of their visits.
Referrers
Reports search engines and terms people used to find your website.
Geographic Tracking
View pageviews by Country and State.
Page Scoring
Assign point values to pages based on importance. For example, a pricing or download page may be worth more than a "Careers" page.
Automation
Set up rules to trigger actions like sending emails based on visitor behavior—saving time and increasing engagement.
Tracking Code
To enable tracking, insert the provided HTML code just before the </body> tag on each page you want to monitor.
To learn more about tracking, see the help articles "Tracking Website Visitors (Sites Built in GreenRope)" and "Tracking Website Visitors (Sites Built Outside of GreenRope)".
The Store section enables you to sell products, services, or memberships directly through your website. You can configure payment methods, create product categories, set up promo codes and tax rules, and run sales reports to track performance.
The store allows you to create and sell products or memberships to your clients.
To create a store:
Add payment method
Go to Settings > Account > Integrations tab
Enter the relevant information for Stripe, Authorize.Net, or Paypal
You can create Personalized URLs (PURLs) by adding /p/FirstnameLastname or /p/Company to your URL.
For example:
www.yoursite.com/p/JohnDoe
www.yoursite.com/p/
www.yoursite.com/p/AcmeCorp
This allows you to personalize the website by looking up the visitor’s information (e.g., their first name, last name, or company name) without requiring people to login.